Installing a new door frame may seem intimidating, but with the suitable materials, tools, and techniques, even novice DIYers can learn how to make a door frame properly. Whether you’re building a new home, remodeling a room, or just replacing an old, drafty door, this comprehensive guide will walk you through the entire process from start to finish.
If you’ve noticed a crack above door frame, it’s essential to address this issue before proceeding with the installation. Begin by examining the crack to determine its severity. In some cases, a minor crack may only require filling with wood putty, while more significant issues might necessitate repairs to the wall or structural adjustments. By addressing the crack beforehand, you’ll ensure a solid foundation for your new door frame and prevent future issues related to the existing structural damage.
Overview of the Door Frame Installation Process
Constructing a door frame requires careful planning, precise measurement, and good carpentry skills. The basic process involves:
- They are selecting suitable materials for the frame and door. Most interior door frames are wood, while exterior doors may use metal or fiberglass.
- She accurately measures the rough opening where the door frame will be installed.
- I am cutting the wood or metal frame components to size.
- I am assembling the head jamb, side jambs, and sill with screws and shims.
- We are securing the entire frame assembly snugly into the rough opening.
- I am installing any exterior weatherproofing elements on outdoor frames.
- I am hanging the prehung door within the finished frame and testing the operation.
- I am adding interior trim and molding for a clean, finished look around the frame.
While it may sound complicated, building a door frame relies on careful prep work, precise construction, and attention to detail. The rest of this guide will cover the critical steps to make a sturdy, seamless door frame for your home improvement project.
Select the Right Materials for the Frame and Door
The starting point for any door frame project is choosing the suitable building materials. For most interior residential doors, a wood frame and hollow core flush door will provide an affordable and attractive solution:
Wood Frame
- Jambs – The vertical side pieces of the frame are commonly made of 2×4 or 2×6 lumber for interior doors. Pine, fir, poplar, and redwood are economical wood choices.
- Head – The horizontal top of the frame is usually a 2×4 or 2×6 board. Match this to the jamb wood type.
- Sill – The bottom horizontal part of the frame uses a 2×4 or 2×6 wood board.
- Stop – Small wood strips holding the door within the frame.
- Casing – Decorative interior trim conceals the gaps between the frame and the wall.
Hollow Core Door
- Thin wooden skins over a lightweight honeycomb interior. Most common interior door type.
- Flush doors provide a sleek, uniform look—there are no panels or decorations on faces.
- It is economical and easy to cut down to size if needed.
When choosing exterior door materials, consider fiberglass or steel for improved weatherproofing, security, and durability:
Steel Frame
- Adjustable pre-fab or custom-fabricated metal frame components.
- Strong, durable, and resistant to outside elements.
- It needs protection against rust if not properly primed and painted.
Fiberglass Door
- Prehung fiberglass doors are lightweight and highly weatherproof.
- It is more expensive than wood but requires less maintenance.
- It can mimic the look and feel of wood with stainable composite skins over fiberglass.
Once you select suitable materials for the specific location and the look you want to achieve, it’s time to start measuring and prepping the work area.
Take Precise Measurements for a Perfect Frame Fit
Accurately measuring the existing opening where the new door frame will go is one of the most crucial steps in the installation process. Even slightly off measurements can result in a frame that is out of square, unlevel, or just an overall sloppy fit.
Follow these steps to measure correctly:
- Locate Rough Opening – Find the studs framing the rough opening and identify the header space above. Remove any old frames or debris still in the opening.
- Measure Width – Take three width measurements across the opening’s top, middle, and bottom. Record the smallest dimension.
- Measure Height – Take three height measurements from the floor to the header at the left, right, and middle. Use the smallest.
- Inspect for Level and Plumb – Check all sides with a spirit level and plumb bob. The opening must be square.
- Account for Finish Materials – If walls or flooring are not yet finished, allow for additional thickness of the final layers.
- Confirm Door Size – Make sure the door unit you purchase or make aligns with the finished opening size.
With detailed opening measurements, you can now use them to calculate where to cut each component of the new frame. Precision is vital here, so go slowly and double-check all your numbers.
Cut Frame Pieces to Exact Lengths
Using a miter saw, circular saw, or even handsaws, cut your frame lumber pieces to the precise lengths determined during the measuring step:
- Jambs – Cut vertical side jambs to the exact height of the opening. Include the thickness of the header and sill if using 2x lumber.
- Head – Cut the horizontal head jamb to the width of the opening.
- Sill – Size the horizontal sill to the width of the bottom. Make sure it overhangs enough to act as a weather barrier.
- Stop – Rip thin stop strips to about 1″ x 2″. These help position the door.
- Casing – Cut decorative trim boards approximately 5″ wider than the jambs and head.
Take your time and cut all frame components with perfect 90-degree edges for clean joins. Discard any pieces with wavey cuts or split ends. Sand cut edges smooth.
Assemble the Frame Pieces
With all your appropriately sized lumber cut, it’s time for assembly. Follow these tips to bring the frame together:
- Dry fit joints first before permanent attachment to ensure proper alignment.
- Attach jambs to the head using two 3″ galvanized screws at each corner—Predrill holes to prevent splitting.
- Make joints tight and at perfect 90-degree angles for a professional result.
- To keep everything aligned, use corner clamps, carpenter squares, and shims during assembly.
- Shim under the sill to bring the whole frame to the right height.
- Don’t attach the door stop strips until after installing the frame into the rough opening.
Take it slowly and carefully, bringing the head jamb, side jambs, and sill into a perfect rectangle. Check for squares along the way.
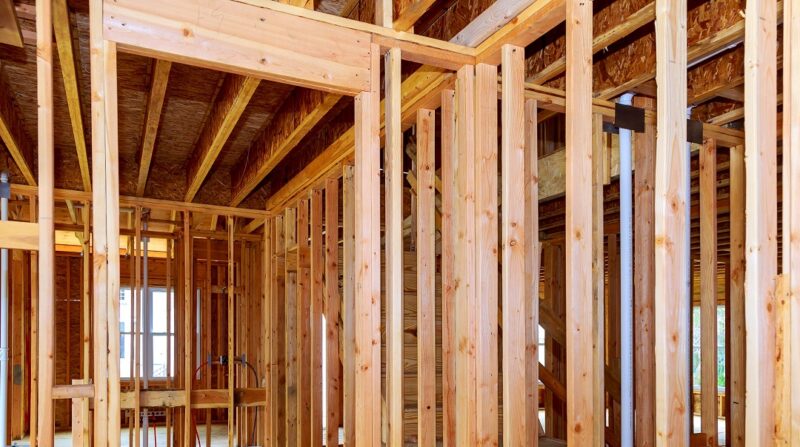
Install Frame into Rough Opening
With the frame fully assembled, you’re ready to secure it into the rough opening in the wall:
- Apply construction adhesive like Liquid Nails to the back edges of the jambs. This helps hold it all firmly in place.
- Lift the frame into the opening, centering it from side to side.
- Insert wood shims spaced every 16 inches between the jambs and studs to fill gaps. Do this on both sides.
- Recheck for plumb and level. Make sure the frame is perfectly positioned before screwing it off.
- Drill pilot holes and drive 3″ screws through the jambs into the shims and studs. Sink screws flush.
- Check all gaps and fill any remaining spaces around the frame with additional shims to prevent twisting.
With ample shims and screws securing it on all sides, the frame should now be solidly installed and ready for the door.
Weatherproof Outdoor Frames
It’s important to seal out drafts and moisture on external door frames. Follow these extra steps:
- Apply adhesive weatherstripping tape along the outside edges and stops. Compress it firmly when installing the door.
- Use longer screws outdoors to anchor firmly into the sheathing subwall.
- Caulk thoroughly on the exterior perimeter between the frame and siding or wall material.
- Consider flashing above the frame and sealing the header space for maximum water resistance.
Take the time to weatherproof outdoor frames properly using quality caulking and sealants. This keeps rain and moisture out of the wall cavity.
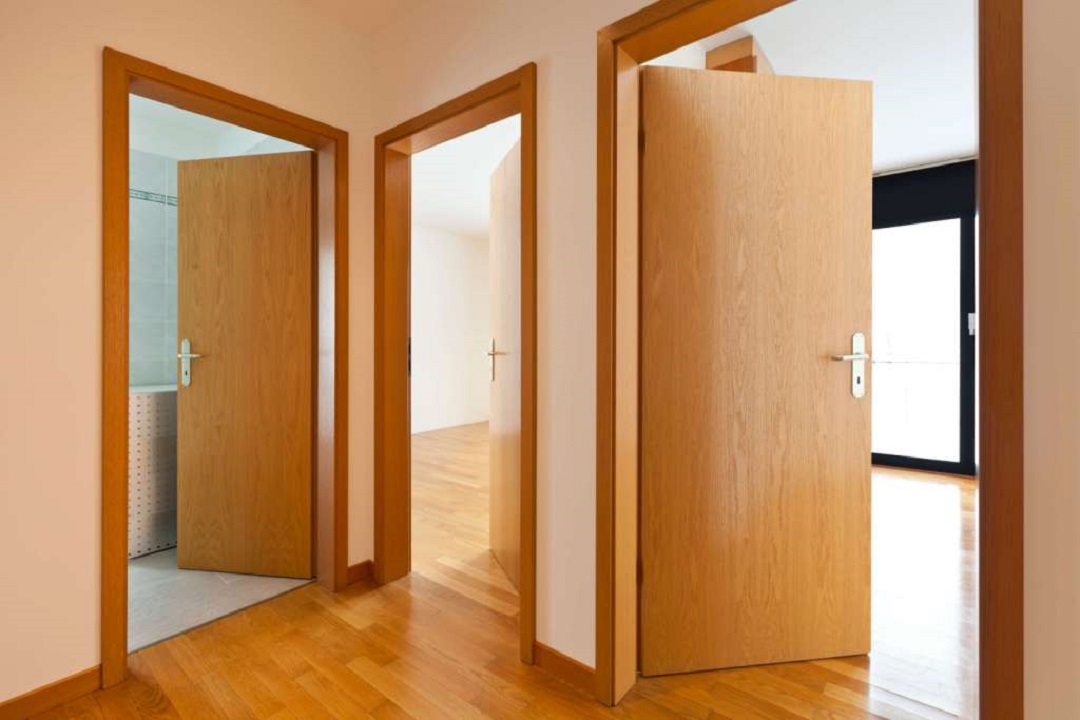
Hang the Door Within the Frame
A prehung door makes for an easier, quicker installation after the frame is securely in place:
- For prehung doors, lift the unit and tilt it into position in the frame. Make sure the hinge side lines up.
- Insert shims between the door jamb and frame side jambs to adjust gaps.
- Drill pilot holes and drive long screws through the door jamb and into the frame. This anchors it permanently.
- Test operation and ensure the door swings freely without rubbing or sticking. Adjust shims if needed.
- Install additional shims spaced along the top jamb to prevent future sagging. Screw these in thoroughly.
Frequently Asked Questions
Q: What kind of wood should I use for the frame?
A: Pine, fir, poplar, or redwood are common choices for interior wood door frames. Use decay-resistant wood or treated lumber for exterior frames.
Q: Do I need any special tools to install a door frame?
A: A miter saw, circular saw, drill/driver, hammer, wood chisels, shims, and carpenter’s square will all be convenient for frame installation.
Q: How much gap should the frame and the rough opening be?
A: About 1/2 inch all the way around is ideal. You need some room for shims, but too much gap can cause twisting.
Q: Should I use glue when assembling the frame?
A: Yes, an adhesive like Liquid Nails helps hold the joints securely when clamping and screwing the frame together.
Q: What’s the easiest way to hang the actual door?
A: Using a prehung door takes much of the guesswork out of getting the door positioned just right within the new frame.
Conclusion
Installing a door frame from scratch may sound complex, but breaking down the process into simple steps makes it very manageable as a DIY project. Accurate measuring, precise cutting, and taking your time to assemble the frame components will lead to a professional-looking result. Weatherproofing exterior frames, hanging the door correctly, and adding trim will complete the job. Follow the abovementioned techniques, and you can confidently tackle making and installing a door frame.